How I deploy my Hugo static website automatically with GITHUB Actions

Some Background
I have been using Wordpress and dynamic websites in one form or another for writing articles for at least two years now. But recently I made a decision of moving away from dynamic website and adopt static website for my blog. There were few key reasons why I did this
- I was paying money for hosting my website on one of the hosting providers.
- The dynamic website was very cumbersome to maintain and I always disliked updating plugins every time I logged into the admin portal.
- The website was slow to load.
- I prefer to write my posts using Markdown language and the personally I did not like the Wordpress support for markdown files.
Hence I decided to use static website. Being really new at creating a static blogging website, I decided to use hugo platform to create my website. Hugo is a website engine written with GO language and it is a good choice because
- It is open source so it is free to use
- Supports inbuilt support for markdown files
- Supports internationalization
- Allows us to create websites quickly as it supports custom themes which can be obtained from hugo themes page or from GITHUB. This makes the website creation really fast. Each theme has a boiler plate of sample site which we can use to set up the blog quickly.
- We can apply lot of customization using short codes we can write our own as well.
- We can change the themes for the website on the go by changing the themes in the config file of the website.
Some Initial Decisions
Setting up initial website is easy, but I must state that if you want to customize it a lot, then there is some learning curve required. You can read more about hugo at Hugo Docs
Armed with basic knowledge, I decided to set up my own website using the Hugo Clarity theme, you can download it from Hugo Clarity
GITHUB allows one static website per account and it provides 1GB of space for us to host it. It is completely free and has baked in support of GITHUB Actions which allows us to setup an automation workflow to deploy our website when we push changes to the repository. Read more about GITHUB Actions
The documentation of Hugo site guides that a common practice to deploy a static website on GITHUB pages is that we create two repositories
- A repository named
username.github.iowhich will contain the assets that will be served over the website - Another repository to host the entire code for the website containing the static assets, themes, configs etc.
This instantly makes sense from the good old Separation of Concerns principle of software development.
The Setup
I created two public repositories
- fullstackmaddy/fullstackmaddy.github.io : To host the assets of the website.
- fullstackmaddy/fullstackmaddy-blog : To contain the code.
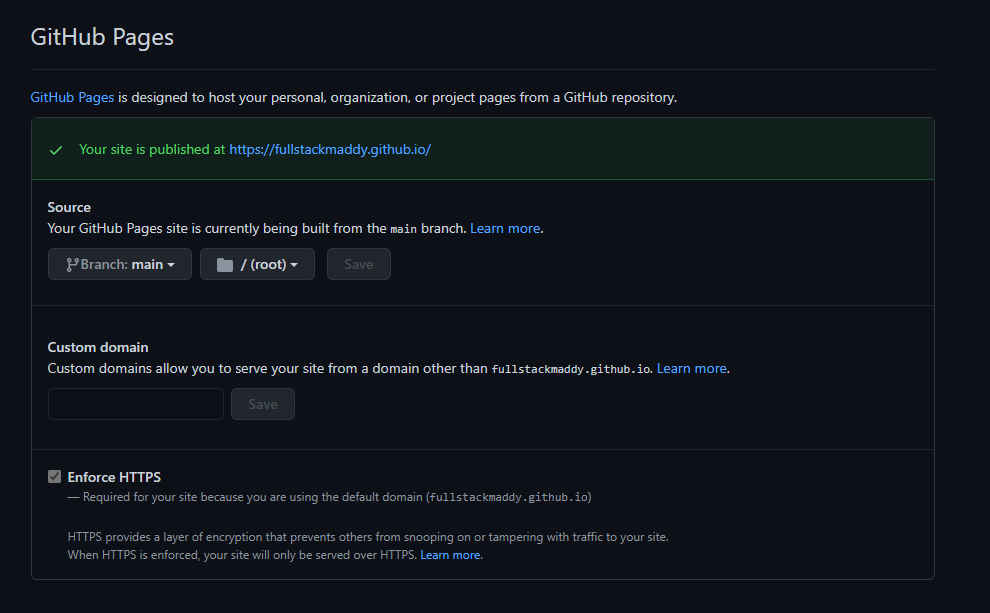
Once we go to the settings, we can see that Github recognizes the username.github.io and gives the locations from which the assets will be served when some visits https://<username>.github.io
I have used following actions from GITHUB marketplace.
peaceiris/actions-hugo@v2more here : This action helps us build the website using the hugo command and help generate the static content which ultimately needs to be pushed to the website repositorypeaceiris/actions-gh-pages@v3more here : This helps us push the content built by hugo to the target repository.
To allow deployment of content generated by step 1, there are three options
- Create a GITHUB token which allows the push
- Create a personal token
- Create public private pair of deployment keys and set them.
I chose the third option as it allows more granularity on what is shared between the repositories. To generate the keys following command needs to be run
1ssh-keygen -t rsa -b 4096 -C "$(git config user.email)" -f gh-pages -N ""
2
This creates two files gh-pages.pub which is the public key and gh-pages which is the private key.
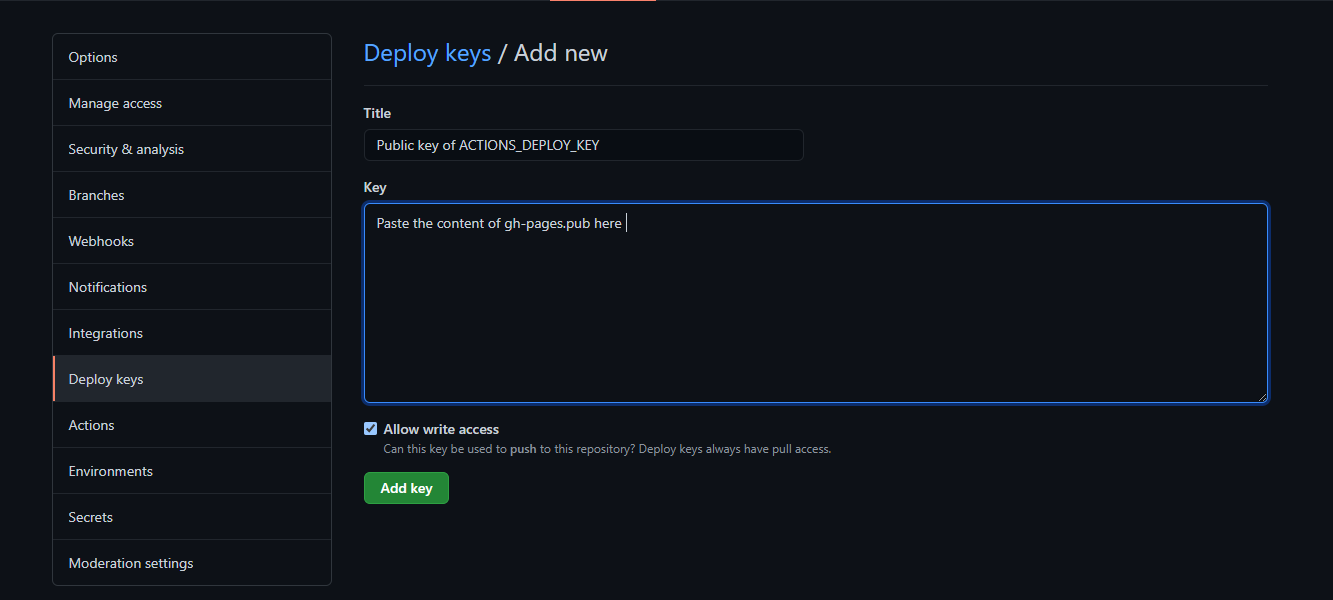
Next task is to add the gh-pages.pub key as the deploy key with write access in the destination repository (username.github.io). It can done as shown below
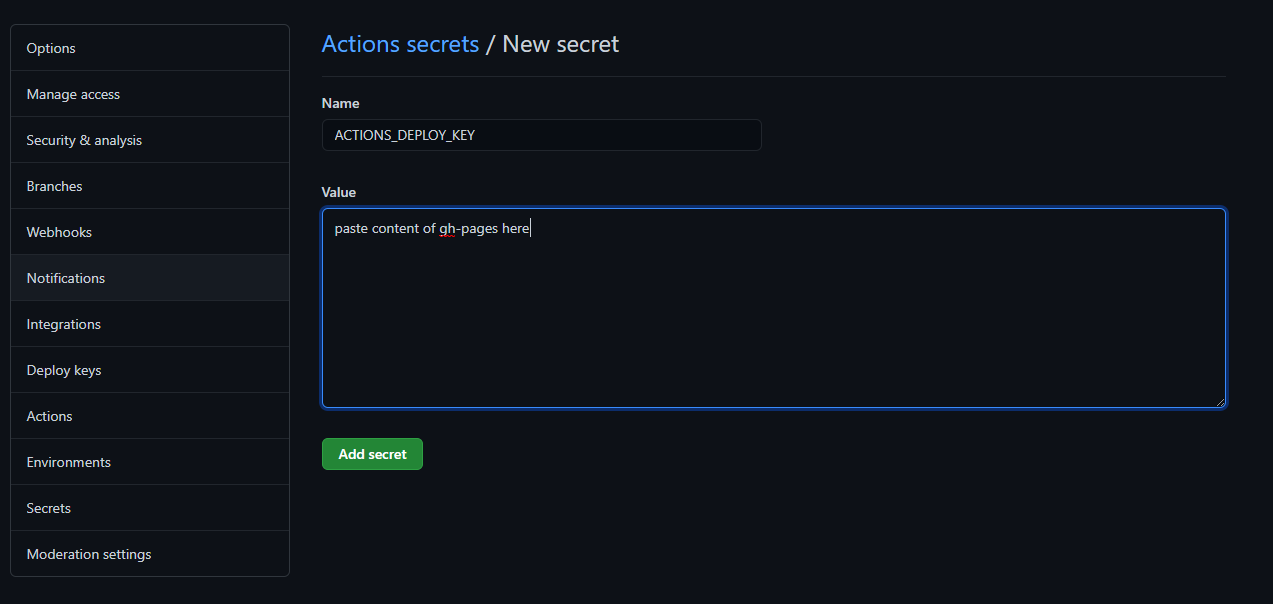
Next task is to add the private key as the secret on the source repository. Following figure shows how to do that.
This completed the basic setup and I created the GITHUB action which is discussed below. (I have assumed that you have some prior knowledge about concepts and terminology of GITHUB actions. If not please head to GITHUB Actions )
GITHUB Action
I will now break down each component of the flow.
Trigger
The workflow is triggered when there is a push to the master branch of the source repository. The snippet looks like
1on:
2  push:
3    branches:
4      - "main"
5
So whenever a push is made on the main branch, the workflow runs subsequent steps.
Next step is to specify where the jobs will be run, I have chosen ubuntu-latest as the platform where the tasks will be run. The first task is to check out the main branch of the repository it is dune using the actions/checkout@v2 . It is done as
1jobs:
2  build_and_deploy:
3    runs-on: ubuntu-latest
4    steps:
5
6    # Checkout the code
7    - name: Checkout the code
8      uses: actions/checkout@v2
9
Once this is done, hugo is setup and the hugo build action is run so that the assets for the static website are created. It is done as following
 1
 2    # Setup Hugo
 3    - name: Set up Hugo
 4      uses: peaceiris/actions-hugo@v2
 5      with:
 6        hugo-version: 'latest'
 7        extended: true
 8
 9    #Build
10    - name: Build Static Website
11      run: hugo
12
And as the final step, the created assets are pushed to the destination repository. It is configured as below.
 1
 2# Deploy the website
 3
 4- name: Deploy Static Website
 5      uses: peaceiris/actions-gh-pages@v3
 6      with:
 7       deploy_key: ${{ secrets.ACTIONS_DEPLOY_KEY }}
 8       external_repository: fullstackmaddy/fullstackmaddy.github.io
 9       publish_branch: main
10       publish_dir: ./public
11       user_name: 'github-actions[bot]'
12       user_email: 'github-actions[bot]@users.noreply.github.com'
13       full_commit_message: ${{ github.event.head_commit.message }}
14
The final workflow looks like following
 1
 2name: Deploy-FullStackMaddy-Website
 3
 4on:
 5  push:
 6    branches:
 7      - "main"
 8
 9jobs:
10  build_and_deploy:
11    runs-on: ubuntu-latest
12    steps:
13
14    # Checkout the code
15    - name: Checkout the code
16      uses: actions/checkout@v2
17
18    # Setup Hugo
19    - name: Set up Hugo
20      uses: peaceiris/actions-hugo@v2
21      with:
22        hugo-version: 'latest'
23        extended: true
24
25    #Build
26    - name: Build Static Website
27      run: hugo
28
29    - name: Deploy Static Website
30      uses: peaceiris/actions-gh-pages@v3
31      with:
32       deploy_key: ${{ secrets.ACTIONS_DEPLOY_KEY }}
33       external_repository: fullstackmaddy/fullstackmaddy.github.io
34       publish_branch: main
35       publish_dir: ./public
36       user_name: 'github-actions[bot]'
37       user_email: 'github-actions[bot]@users.noreply.github.com'
38       full_commit_message: ${{ github.event.head_commit.message }}
39
I have also added a badge on the README.md file of the source repository so that any point I know that my workflow is working properly or not. The typical badge looks like following.

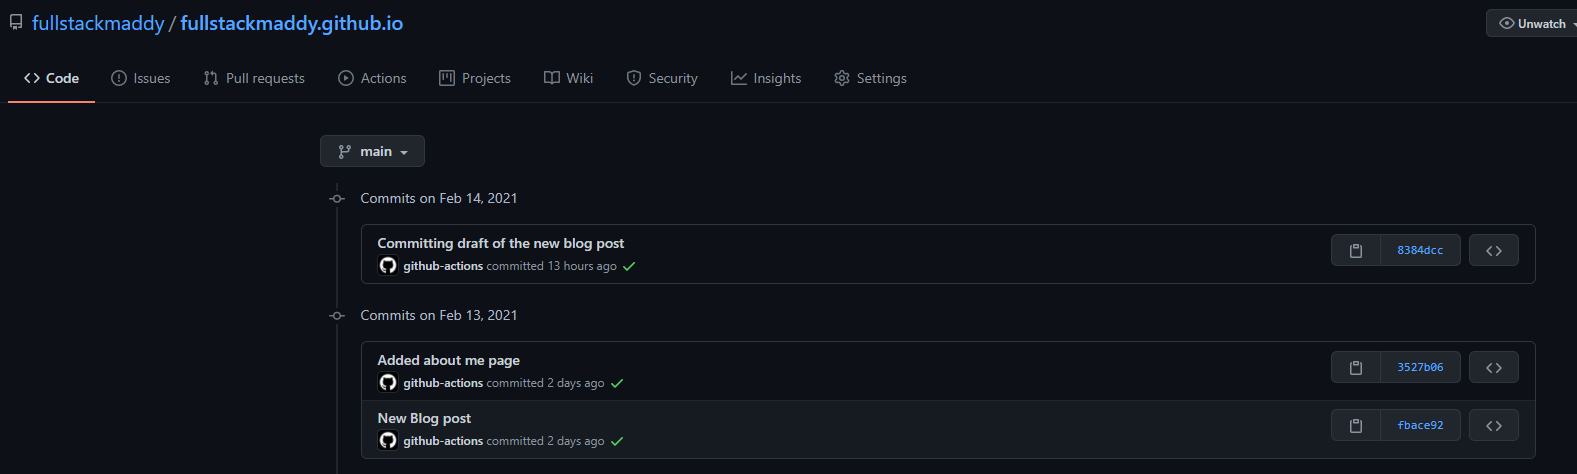
The messages and the commits made by the bot are available for inspection
And that is it, this takes care of the deployment of the new blog posts to my website.
Possible Improvement
I am thinking of adding tags to my commits and change my workflow to trigger on only specific tags.
PS: This post is also automatically deployed.
comments powered by Disqus